Here below is my second attempt at DIY, for your entertainment, ladies!
 I found a tutorial online (sorry I can't give the link as it's lost in my confused filing system!) so here goes -
To save making mistakes I decided to practice first by wrapping the doll's head in cling film/food wrap and tying it down tightly. This way means you can practice until you know you can do it right with the method, and the materials you have chosen.
 Doll hair seems to be usually made from viscose or mohair or lambswool, depending on the look you want. Mohair is said to be a bit stiff and good for male beards etc. Viscose can be rolled and heated to make ringlets or curls, and lambswool is already a bit curly.
I had a hank of tussah silk sliver on hand so I thought I'd try using that.
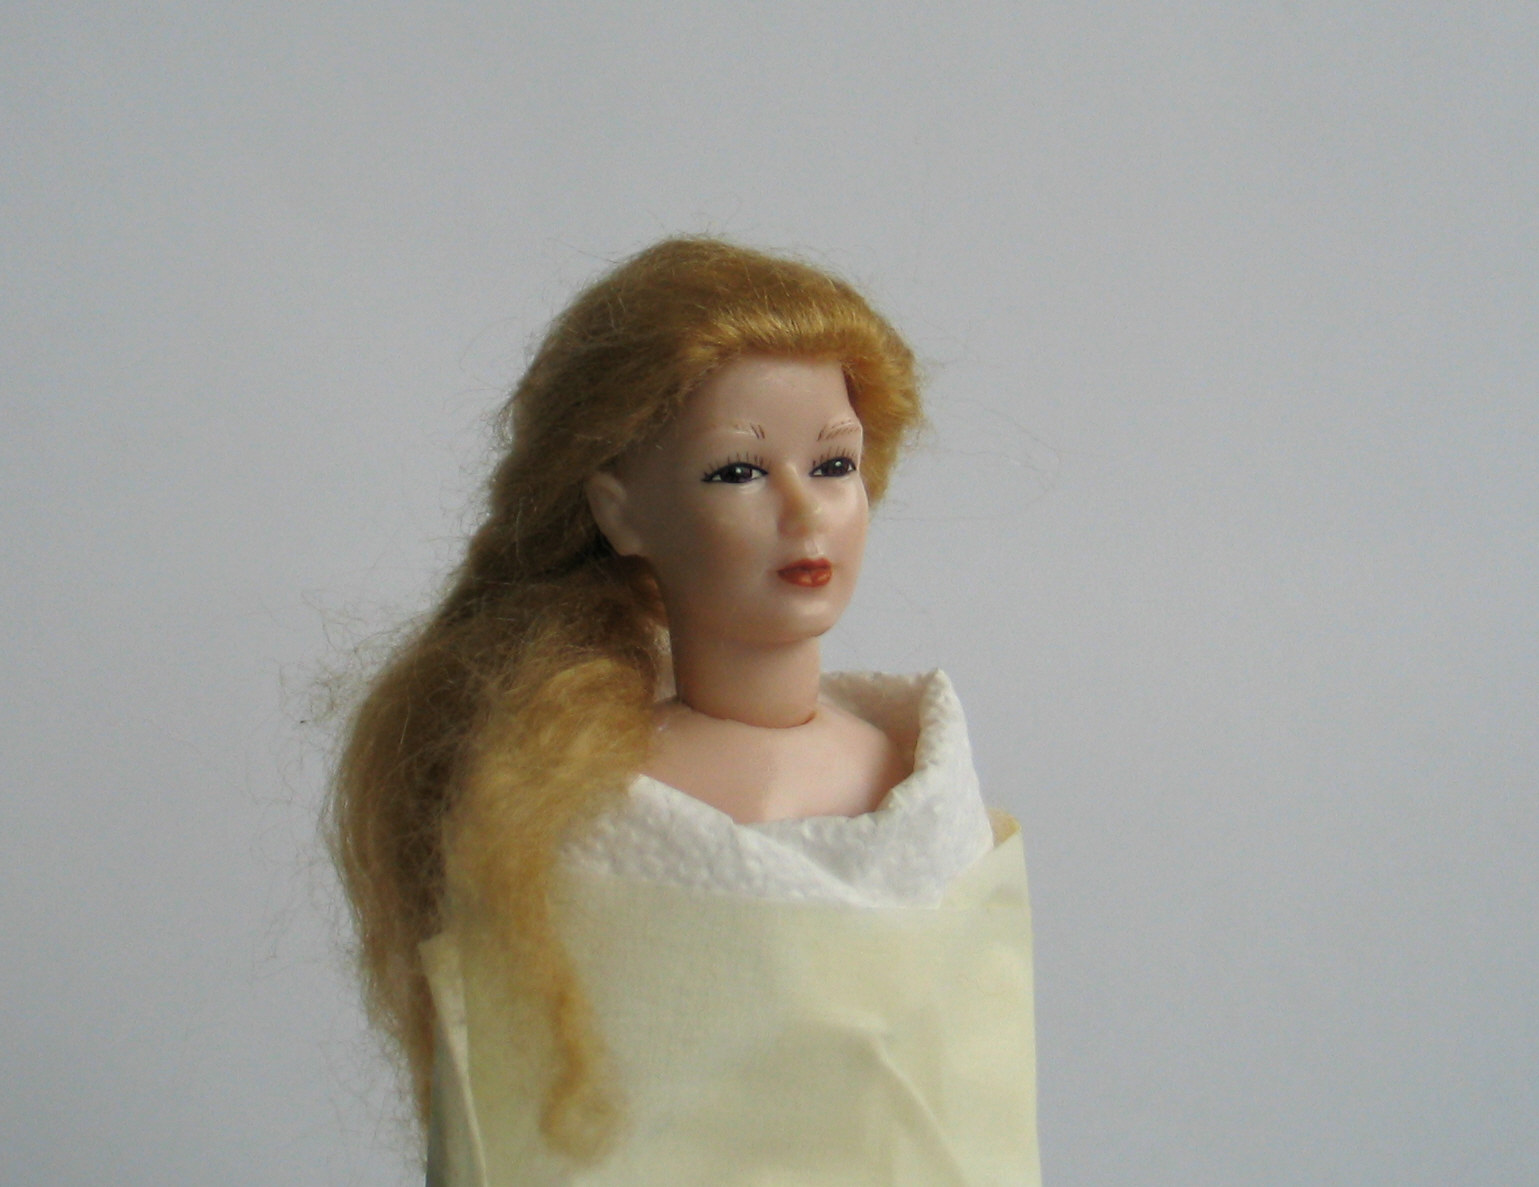
I cut a length about 20cm long and dyed it with coffee.
To dye it - tie both ends of the little hank to prevent it becoming tangled while dyeing. Move the silk as little as possible while dyeing. Put a cup of strong cold coffee in a wide heat-proof glass dish and add 2 tablespoons (50ml) of white vinegar. Add the silk and make sure it is thoroughly wet. Microwave on high for 90 seconds, stir it very gently then heat for another 90 seconds on high. Remove from the oven (carefully, it's hot) and leave to cool a bit. Add tepid water slowly to cool it more if you're impatient. Then rinse well in tepid water, roll it in paper towels or a clean cloth to remove excess moisture and lay straight to dry. Cut one end and gently comb it out ready to use.
The coffee dye produced a red-blonde colour - it wouldn't go darker because of the natural sericin in the tussah silk. Bleached silk sliver would dye darker.
 Apply tacky glue to the plastic wrap over the head, stopping at the natural hair line.
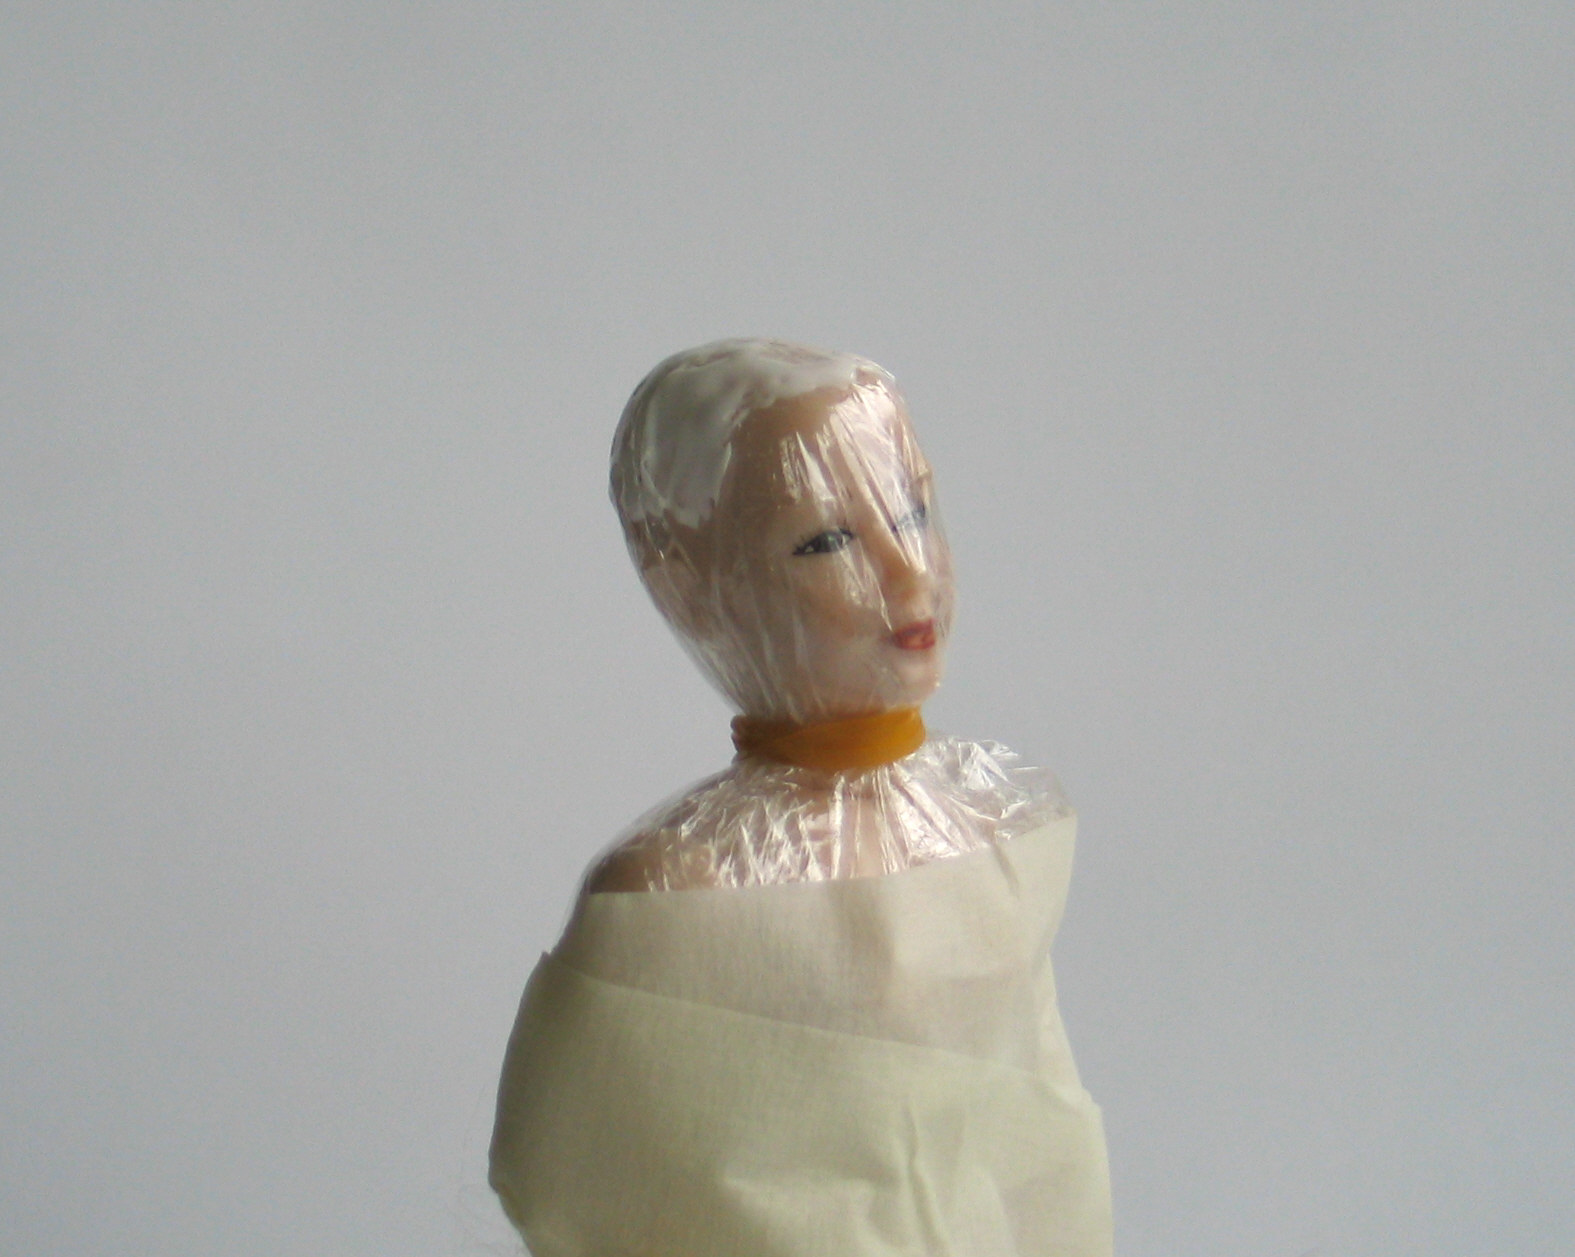 Select a small bundle of the silk and lay it from forehead to nape onto the glue as shown below, and press it all down.
 Run a fine line of glue across the top of the head from ear to ear.
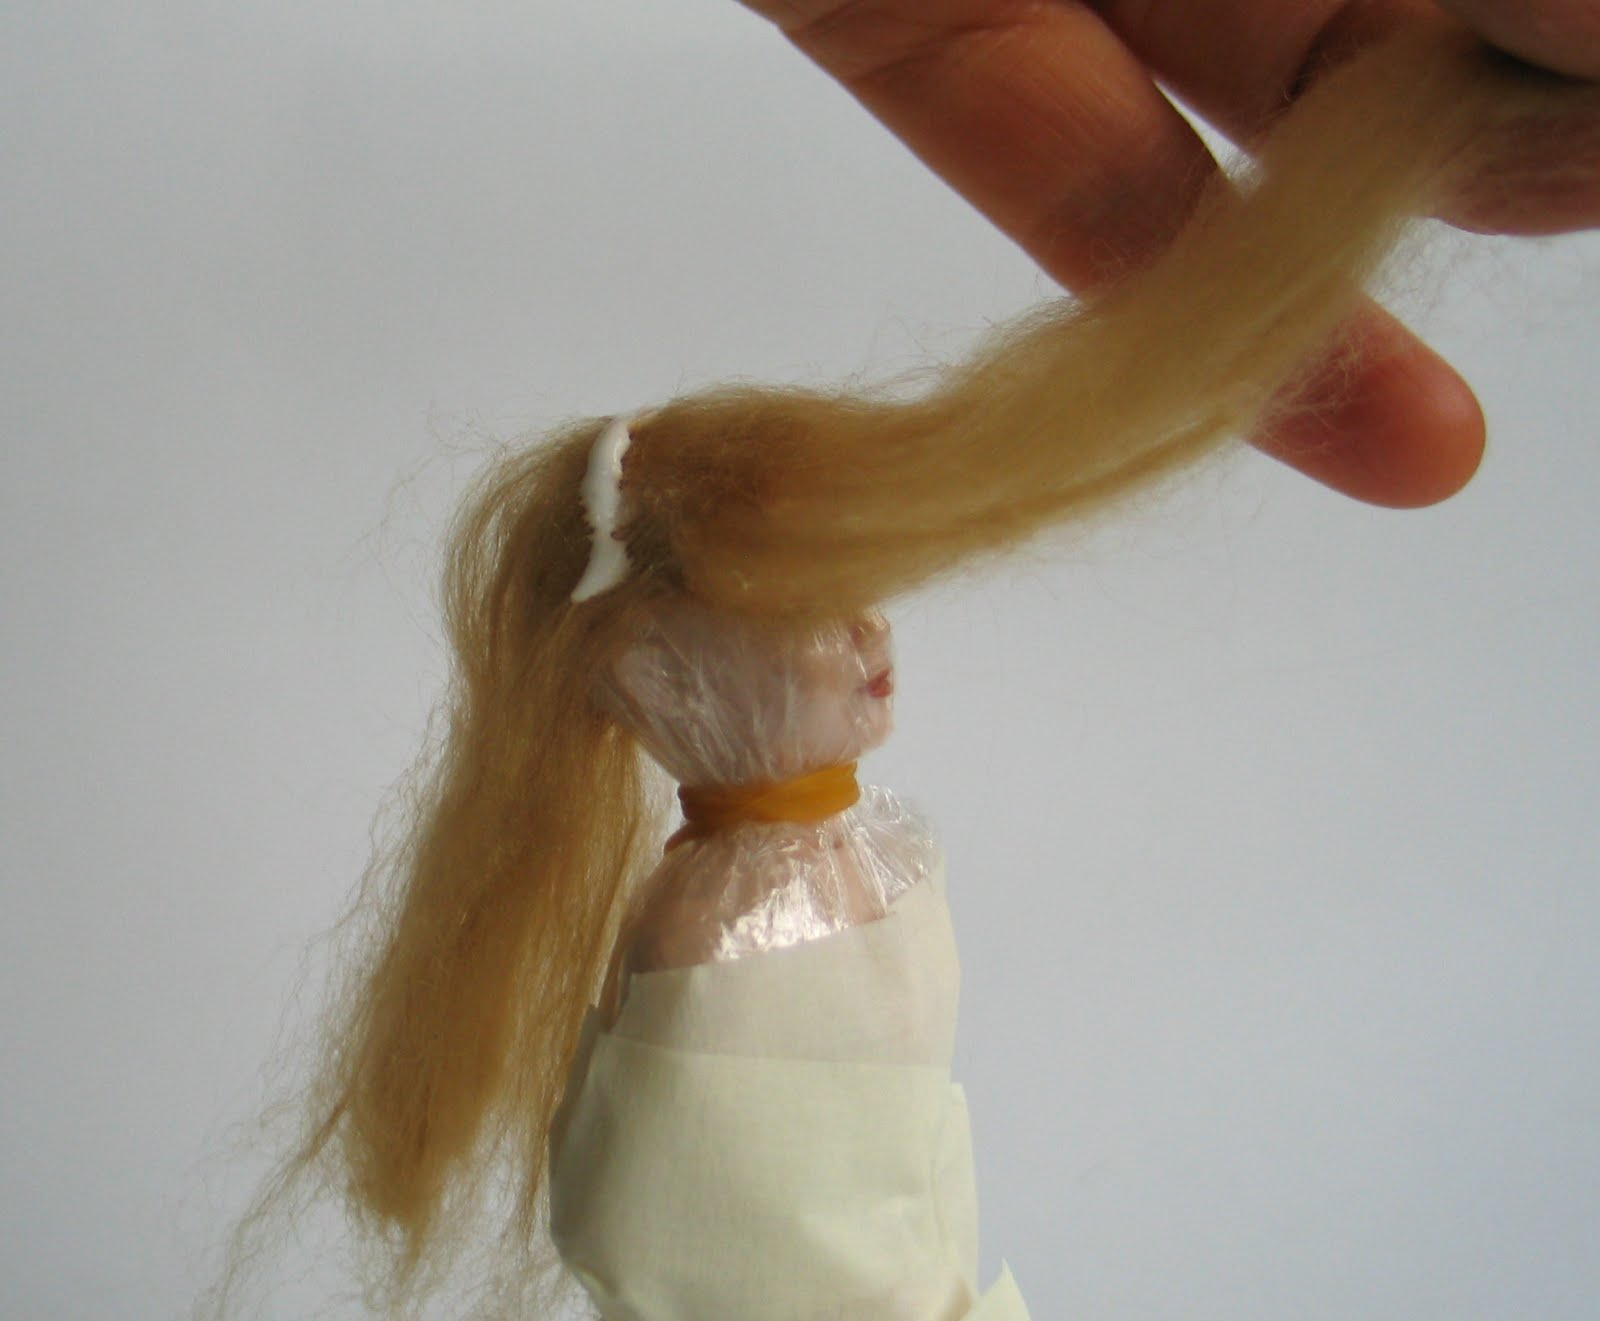 Apply a fine hank of hair to this and press down firmly. This is the hair which naturally sits at the ears, and this addition also helps to secure the main hank of hair down onto the head. Let this all dry thoroughly.
 The front hair can now be gently pulled back into the desired style. Here is a quick Edwardian look :)
 And now for the magic bit - grasp the hair in a bundle at the back and gently pull it up and away from the plastic wrap - it will come away as a loose wig, fully shaped to your doll's head.
Here below is one I made in viscose.
 Now I can practice making wigs until I'm happy with one, which can then be permanently attached.
Notes - test a blob of your chosen glue on the plastic wrap first (it seems that no glue likes to stick to it) and make sure it peels away after drying. This worked for me with Aleene's Tacky Glue, Instant Grrrip and Crafter's Pick.
So there it is - a bit rough as tutorials go, but I hope it helps.
Glenda :)
Very impressive! Soft dolls are hard enough to 'hair' - minis must be a nightmare sometimes.
ReplyDeleteVery nice job!!! It's fun isn't it.
ReplyDeleteI have just tried it myself on a much smaller doll's doll. I found Downy Fabric Softener mixed (two table spoons in a spray bottle) with water made all the difference for me. It helped me smooth and kept the fine hairs manageable. I also used a quilling needle to make curls. Which the Downy was very useful for. All were tips I got from Patty.
Thanks for the tip, Catherine - I saw your lovely little doll, she helped me make up my mind to try this :)
ReplyDeleteMy first attempt is not neat at all,but I'm happy now I know the method, and can improve. I haven't tried curling silk yet.
Glenda
Glenda,
ReplyDeleteThat quilling needle thingy was a huge help to make the curls. I bought it on Amazon.com
I had a tiny spray bottle and just added what I thought would be enough Downy. Because the doll head was so small I sprayed my finger to apply it to the doll hair. That way I knew I wouldn't get it too wet.
Glenda, this is great! Thank you! I can use the coffee dying tip for my silk and maybe other fibers I use for my animals. I like the color that it turned the silk. And Catherine, what the heck is a quilling needle? Because I think I might want to try Patty's tips with the needle and fabric softener. :)
ReplyDeleteFiver - the dye recipe for silk can also be used with food colouring - about 10-12 drops per 1 cup of water and 50ml of white vinegar. I've recently had a fine time making tests of different colour mixes.
ReplyDeleteYou can also use strong tea for a redder brown.
This acid/vinegar recipe is for protein fibres - silk and wool - it won't work on cellulose fibres (cotton/linen).
Glenda
You have done a great job Glenda, the reddish blonde one looked really good!
ReplyDeleteGlenda, this is an excellent explanation of how to. I especially like the using plastic bit (the pic made me giggle :) ) and you can also use this method to make wigs in a Victorian setting. Thanks!
ReplyDeleteMuchas gracias Glenda!!!
ReplyDeleteEl tutorial me va genial, tengo que hacer un personaje y no sabia como poner el pelo.
besitos ascension
Wow Glenda for a first attempt this seems pretty impressive to me. The edwardian style looks perfect.
ReplyDeleteGreat job!
This is so cool turtorial Glenda! I have never tried to glue the hair to the piece of plastic! It gives so many possibilities! Thank you so much!
ReplyDeleteAnother thing I forgot to say is that I gently sandpapered the doll's head where the hair goes, to make it better for the glue to stick. Once the final wig is on,it can still be peeled away later if you want to change it :)
ReplyDeleteGlenda
thanks for the tutorial, glenda. the plastic is a great idea as i will be wigging my first doll as soon as i put him together and i'm just winging (wigging?:) it. thanks again.
ReplyDeleteberri
blackberritart.blogspot.com
Wow. This always seems so intimidating to me, but you've made it look doable. Maybe someday I'll get up the nerve. :) I love the Edwardian 'do.
ReplyDeleteCia
Gracias por tus instrucciones. Y mil gracias por contarnos tus errores, así la persona que se atreva a hacerlo los evitará.
ReplyDeleteBesos Clara
I must say that this whole operation, is pretty awesome!
ReplyDeleteThe dolls bald, I have always been afraid ...
However, you're a genius :-)
Mini hugs, Flora
Thankyou ladies! It's a pleasure to be able to share both my mistakes and my successes with you all ;)
ReplyDeleteWhat an excellent tutorial Glenda...I got into such a mess when I was wigging my one and only sculpt.
ReplyDeleteYou did really well and I love the idea that it is removable :-)
Thanks for the help with hair was wondering myself how to do that!
ReplyDelete